Programming Arduino Uno Hardware Memory Types

In a previous post, I referenced a Linux Journal article looking at Arduino code development from a programmer’s viewpoint. Today’s ‘Arduino programming’ post will address what types of memory hardware are in the Arduino Uno and a little bit about how those different types of memory are used.
Arduino Uno hardware components (from Zenbike.com)

All the memory of a standard Arduino Uno R3 board is found in the Atmel ATmega328P microcontroller (MCU). If you look at the Arduino Uno Zenbike photo on the right that has the Arduino hardware components labeled, you can see where the microcontroller is located on the board. To begin understanding Arduino programming from a hardware standpoint, we need to know what chunks of memory hardware are inside that Atmel MCU.

The ATmega328P has three types of memory hardware:

  • 32 KB of In-System Programmable (ISP) Flash program memory
  • 2 KB of SRAM (Static Random-Access Memory)
  • 1 KB of EEPROM (Electrically Erasable Programmable Read-Only Memory

Memory and CPU from ATmega328P block diagram
ISP flash memory is where most of programming is stored. The Atmel MCU in the Arduino Uno has 32 KB of ISP flash. This is more room for program storage than some MCUs, especially other 8-bit MCUs, but there are many MCUs that have more memory. So if you’re working with a complex program on the Arduino Uno and run out of storage space, one option might be to use a different MCU that has more program memory capacity. For more info regarding the specifics of ISP flash on the Atmel AVR MCUs, see Atmels application note about that topic. Heres how Adafruit describes the ATmega328s flash:
Flash memory is used to store your program image and any initialized data. You can execute program code from flash, but you cant modify data in flash memory from your executing code. To modify the data, it must first be copied into SRAM. Flash memory is the same technology used for thumb-drives and SD cards. It is non-volatile, so your program will still be there when the system is powered off. Flash memory has a finite lifetime of about 100,000 write cycles.”
The ATmega328P’s 2 KB of SRAM is used in three main ways in the Arduino (info from above Adafruit link):
  • Static Data - This is a block of reserved space in SRAM for all the global and static variables from your program. For variables with initial values, the runtime system copies the initial value from Flash when the program starts.
  • Heap - The heap is for dynamically allocated data items. The heap grows from the top of the static data area up as data items are allocated. 
  • Stack - The stack is for local variables and for maintaining a record of interrupts and function calls.”
If you’ve gotten to the point where your MCU project’s program is controlling many items, receiving lots of inputs and just generally doing a lot of work, you might start taxing the SRAM. If that happens, or maybe to prevent that from happening, you might want to read Adafruit’s guide to optimizing use of SRAM, which says,
SRAM is the most precious memory commodity on the Arduino...SRAM shortages are probably the most common memory problems on the Arduino...If your program is failing in an otherwise inexplicable fashion, the chances are good you have crashed
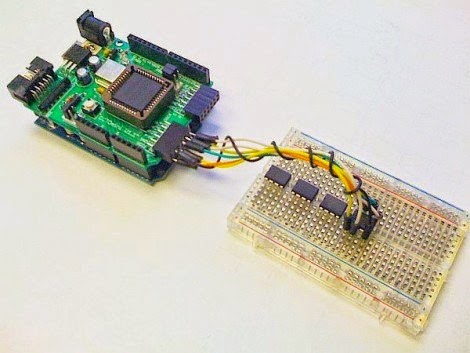
Hackaday -- CPLD shield with 2 MB SRAM
the stack due to a SRAM shortage. There are a number of things that you can do to reduce SRAM usage. These are just a few guidelines
...”
If you think you’ve crashed your Arduino because of program complexity, especially a program which might be expecting a lot in the areas of static data, heap and stack, try some of Adafruit’s suggestions for improving SRAM use. Also, because SRAM is the “most precious memory commodity on the Arduino,” you may want to consider a shield that provides more SRAM. Hackaday has a post showing a CPLD (Complex Programmable Logic Devices) shield that increases SRAM from the standard 1 KB by three orders of magnitude up to 2 MB.

Tronixstuff.com has a pretty good post about what the 1 KB of EEPROM in the Arduino Uno can be used for.
EEPROM...is a form of non-volatile memory that can remember things with the power being turned off, or after resetting the Arduino...we can store data generated within a sketch on a more permanent basis...where data that is unique to a situation needs a more permanent home. For example, storing the unique serial number and manufacturing date of a commercial Arduino-based project – a function of the sketch could display the serial number on an LCD, or the data could be read by uploading a ‘service sketch’. Or you may need to count certain events and not allow the user to reset them – such as an odometer or operation cycle-counter.”  
If you find yourself needing more than 1 KB for storing data, there are EEPROM shields like the one shown at the left. However, as mentioned above, if memory capacity becomes an issue, you should first determine if a different MCU with more internal memory might be more appropriate for your use case.

Arduino beginners don’t need to be too concerned about where the different parts of their programs and data are being stored while they’re learning how to make an LED blink or doing the early Blum tutorials. As your Arduino programs get larger and more complex, however, you’ll probably want to put more effort into managing memory use on your Arduino. If this memory hardware guide for your Arduino doesn’t point you to a helpful resource for that memory management, you can put Google to work finding other resources for you.

**********
Read More..

Looking At Arduino From A Programming Viewpoint

Because the Arduino single-board microcontroller is a piece of hardware, most of my focus in trying to understand the world of microcontrollers (MCUs) so far has been on the hardware aspect. You know -- what components hook up to which pins on the Arduino, and what do the different electronic components do in each of the circuits I cobble together.

To get the most out of microcontrollers, though, one also needs to understand the software or firmware side of things. To get a better picture of how Arduino software functions, you may want to consider reading an article John H from the Humboldt Microcontrollers Group linked me to. The article is titled, "Understand Arduino development" and starts out this way,
"Arduino is a fantastic platform for getting started with embedded software development. You are provided a development board, and programming IDE all configured to work together immediately. As a developer, all you need to do is write your program, press a button, and it is compiled and uploaded to the board where it begins execution. Its important you understand the fundamentals of what is happening in the background to make this work for you."
I need to do more online research about the differences between learning C and learning C++. Then I need to buy Nick or John a beverage and have a discussion about whether my C / C++ studies should be done with tutorials, websites and books that focus on C or on C++. If I need the basics of C to do much of anything in C++, it might be helpful to know what specific aspects of C++ should spice up my C studies. According to the article linked above,
"The Arduino IDE compiles your project as C++ using the GNU AVR toolchain...So you are writing "real" C++ code, though there are a few hardware limitations to keep in mind. Its called the GNU AVR toolchain because it compiles code for the AVR micro-controller architecture."
I am especially interested in the section of the article that talks about large projects. Most of my learning projects will be pretty simple, but down the road I hope to get to the point where Ill build an MCU project with fairly complex functions and programming requirements. It appears it
will likely be helpful to learn how to write libraries in the Arduino IDE as well as sketches. According to the "Understand Arduino development" article,
"The Arduino IDE has the concept of a "sketchbook", and the programs that you write are called "sketches". So the sketchbook is a folder which contains all of your sketches...The sketchbook should also contain a folder called "libraries", which allows you to share code across sketches. Similar to structure of a sketch, a library needs to be a folder where the name of the folder is the name of the library...The main reason you would consider this is because you should split your project into multiple files by their logical function. You are not limited to using libraries to achieve this either, a sketch can have multiple source files...Splitting the project into modular files is key for long term development. It allows you to reuse code later on without having to copy and paste individual functions out of source files, rather you just include the library or add the source files to your sketch. When you make your project modular, you can document each module on its own, which allows others to use that module in their own projects without having to understand how the entire program works."
There are lots of two hour introductory classes or sessions on Learning The Basics Of Arduino where a person starting with no knowledge about MCUs or electronics can hook together a basic circuit and make an LED blink. But like anything complex and powerful, there are many hours of study and experimentation required to become reasonably skilled in the Art of Microcontrollers. Reading about "splitting the project into modular files" reinforces that blinking an LED is significantly different from becoming skilled with MCUs.

Reading the article (twice, so far) that John linked me to and doing a bit of related online research has had a definite impact. It convinced me I need to block out more time in my schedule for completing the work in the Jeremy Blum video tutorials and for gathering background information for a couple microcontroller projects that arent in the videos.

**********
Read More..

Arduino Uno vs TI LaunchPad MSP430 edition

[Post today by Ed Smith, Member of the Humboldt Microcontrollers Group]

Today Im going to compare the well known Arduino platform to a relative newcomer, the Texas Instruments (TI) LaunchPad.

Im writing this with the assumption that you, the reader, have at least a vague idea what a microcontroller is and are curious about them.

Arduino Uno (Atmega328P)

There are a lot of Arduinos out there (link), were going to focus on the Uno as its the gold standard of Arduinos. You can get smaller Arduinos, cheaper Arduinos, more powerful Arduinos, but it all centers on the Uno. This is an Uno (photo from Arduino.cc):


For the full specs, click here.

An Arduino Uno will run you between $25 and $30 depending on where you buy it. This gets you an Arduino Uno only; youll need to buy a USB-A to USB-B cable to plug it into your computer, so figure $30-$35 for Uno+Cable.

This gets you 20 IO pins, 6 of which do analog input and 6 of which can do PWM output (pulse width modulation). Should your code crash or you have other reasons to need it, there is a RESET button on the board. There is an LED built into pin 13 for easy testing and/or status reports and/or the MCU version of Hello World!. Disabling this LED if you want to use pin 13 for something the LED interferes with requires cutting a trace or de-soldering the LED.

Arduinos have a lot of expansion options. Boards called shields can be stacked on top of the Arduino board to add features. Ethernet? Sure! Motor control? You bet! WiFi? Yup. GSM Cell Radio? Why not? The full list is too large to list here. Many of them can be stacked on top of other shields as well. Arduinos start to look pretty funny after two or three shields are stacked on them, but its a wonderful ability.

The really cool bit about Arduinos though is the IDE (which stands for something Im sure, but I dont know what). It takes the opaque (to me, anyway) mess of the AVR C language and turns it into a fairly simple, fairly logical language.

Also worth noting is that Arduino is a separate entity from the company that manufacturers the actual microcontroller chip. Atmel makes the microcontroller chip, then Arduino buys the chip and assembles the single-board microcontroller and sells it.

Texas Instruments MSP430 LaunchPad

Now that weve met the Arduino, lets meet the TI LaunchPad (MSP430). One of the more important differences relates to who makes the MCU on the LaunchPad. TI makes it. TI is big, TI is bloody huge. This means that TI can make a microcontroller development board (what an Arduino is too, as a note) for a lot less money than a relatively small company like Arduino can.
This is a TI LaunchPad (MSP430G):
For full specs, click here.

A TI LaunchPad (MSP430) costs $10 with free shipping from TI directly. Thats pretty amazingly cheap. This gets you the LaunchPad, a USB cable (Mini-USB, just like cameras and such) and, in the case of the units I bought in 2012, three MSP430G chips of varying complexity and speed. Ill be talking about the MSP430G2553 in this article, as it is the most powerful of the three and what you officially get with the board. I do not know if you still get the extras now (2014).

You get 16 IO pins, of which 8 can do analog input and 7 can do PWM. You also get a green LED connected to a PWM pin and a red LED connected to a digital IO pin. Both LEDs can be detached from their pins by removing a pair of jumpers. You get a RESET button just like the Arduino, as well as an extra pushbutton that you can use in your projects.

TI puts out an IDE (actually a couple) for programming the MSP430. I have attempted to use it and failed miserably. If youre fluent in C you may have better luck. Thankfully the folks at Energia.ru have ported the Arduino IDE to work with LaunchPads! Theyve ported many libraries as well, so many Arduino programs can be moved between the two platforms very easily. Its not quite a simple copy/paste as the pin names are different, but its close. The LaunchPad also has expansion boards, TI calls them BoosterPacks. They add all sorts of features, just like the Arduino shields do. The BoosterPacks do not, however, stack.

Now that weve met the two, lets compare directly! Im going to list the advantages that each platform has; this is not a comprehensive list.

TI LaunchPad MSP430 Advantages: 
  • Much lower cost. $10+tax and youre set. Ardunos $25+tax+shipping+buy-a-USB-cable cant compare.
  • Better built in LEDs, and a button.
  • Standard header spacing for pins, no odd 0.05" gap to foil breadboard/perfboard projects.
  • Much more flexible PWM controls. The MSP430G2553 uses a 16 bit timer for PWM rather than the Atmega328Ps 8bit timer.
  • Very good low power draw features for long battery life.
  • Replacement chips dont need pre-programming/bootloading before working with the Energia IDE.

Arduino Uno Advantages:
  • Massively huge community support. This is not to be under-estimated.
  • Stackable shields mean the sky is the limit for feature expansion.
  • Capable of 40mA source/sink per pin; this is enough for very bright LEDs. The MSP430 LaunchPad caps out at ~ 4mA.
  • Can run at 5V or 3.3V (or anywhere between 1.8V and 5V if you change oscillators). The MSP430 caps out at 3.6V.
  • More IO pins, 20 vs 16. It might not seem like a huge difference, but I have projects where Ive used 18 of those pins after using a pin expander to gain 8 more.

Either board is an excellent choice for people just starting out in the microcontroller world. Personally I prefer the MSP430 LaunchPad for most things due to the button, LEDs, and cheap replacement cost if I blow it up. I have many, many Arduinos, however, and use them quite often as well.

Its worth noting that both TI and Atmel make a lot of different microcontrollers. TI makes a number of snazzier LaunchPads, and Arduino makes a number of snazzier Arduinos as well. Many of the LaunchPads are Energia compatible; all of the Arduinos are Arduino IDE compatible of course. Many other Atmel MCUs are also Arduino IDE compatible with modifications/expansions of said IDE.

**********
Read More..

Finished 2 Arduino Basics Video Tutorial

So tonight I finished the #2 Jeremy Blum video tutorial on Arduino Basics.

I was hoping to finish both #2 and #3 videos this weekend, but life interrupted and the best I could do was to finish the #2 video. Connecting the components for each of the exercises in the videos then writing or modifying the sketches (Arduino programs) per Jeremys instructions isnt hard, generally speaking. But it does give a small sense of satisfaction just to watch the LED blink correctly or for the LED to brighten as you press the switch. Baby steps. With a lot more
components, a lot longer and more complicated sketch, and probably longer debugging time, when I upload the make the robot walk sketch and hit the run switch, Ill have the satisfaction of seeing the robot walk across the room! Or the Halloween decoration light up and emit scary sounds. Or the garden sensors check the soil moisture to let me know if the tomatoes need to be watered.

The screws I complained about yesterday for attaching the Arduino to the wooden base -- apparently they werent missing. What was missing was my understanding that when the instructions said screws, they were referring to what I think of as bolts. So now the Arduino Uno is attached to the wooden base. With screws and nuts.

Also had a chance today to find all the components online that I need to finish ordering for the first five Arduino Basics video tutorials. Ill place the order for those tomorrow. The parts ordered last week from Adafruit and SparkFun should arrive sometime this week.

**********
Read More..

A Good Humboldt Use For Arduino Gardening

So yesterday I said Id write a bit about Arduino, a currently popular type of microcontroller, or single board microcontroller.

Arduino is an open source hardware project that was started in Italy and has spread around the world in the past several years.

If you search on Google for Arduino projects, youll get more than ten million hits. Arduino microcontroller boards are being used for just about anything and everything that people can think of. And one of those things is gardening.

There are projects like Growduino, Garduino (which has been superseded by growerbot), and the Horto Domi Kickstarter project.

In the Humboldt Microcontrollers community activities, one of the projects I plan to work on is some type of application for Arduino in the garden. A recent post at Cooking Hacks was about the launch of their Open Garden Project. The post says:
"...there is a lot of interest in urban or terraces vertical gardens that allow grow vegetables in the city centers controlling firsthand the level of fertilizer used. This week, we are happy to announce our newest product: Open Garden. We put our knowledge of electronics and sensors at the service of gardening and hydroponics, trying to help all of you interested in gardening and plants. Open Garden is a platform for garden control using sensors oriented both exterior and interior gardening or even hydroponic farming. The aim of the platform is to measure parameters such as Soil moisture (Indoor & Outdoor kits), Water sensors: pH, Conductivity, Temperature (Hydroponics kit), and Temperature, Humidity and Light (All kits)...Open Garden programming has been developed as Open Source so that users can access the source code to customize and adapt to their needs..."
Well probably discuss some Arduino gardening applications at the May 15 meeting, so if youre interested in either automated gardening or the video tutorials about the basics of Arduino, come to The Link at 1385 8th Street, Arcata, CA, USA, from 6 to 8 PM on Thursday, May 15.

Hope to see you at The Link! If you have questions about the Humboldt Microcontrollers community, send me (Bob Waldron) an email at arcatabob (at) gmail [dott] com.

**********
Read More..

Blum 6 Arduino Video Tutorial Humboldt Microcontrollers Group Meeting

Tonights post is a quick look at the #6 Arduino video tutorial from Jeremy Blum, which is the main topic for the Humboldt Microcontrollers Group meeting this Thursday, June 26.

The #6 video tutorial, Serial and Processing takes a look at how to use an Arduino for communicating with the computer via a serial connection and using a programming language called Processing to visualize information from an Arduino on your computer screen.

For the serial communication between the Arduino Uno and the computer, the 0 RX (receive) pin and the 1 TX (transmit) pin on the Arduino are used. You connect the Arduino to your computer via a USB cable, which has 4 pins in it. One is power and one is ground. The other two are the serial transmit and receive pins. The USB transmit pin from the computer connects with the receive (RX) pin on the Arduino, and the computers USB receive pin connects to the Arduino transmit (TX) pin.

Jeremy runs through a number of Arduino programming examples for learning how to use the serial communication features. If you go through the #6 Blum video and feel you still want a little more background on serial communication with Arduinos, here are three other resources to look at:
  1. The Arduino.cc reference page for serial communications
  2. An Arduino tutorial from Ladyada about serial communications
  3. A guide from Instructables on Serial Communications with Arduino
After he does the serial communications exercises, Jeremy covers a little bit about the programming language Processing. You start out by going to the website for Processing. The home webpage for Processing says its an open source language that:
"has promoted software literacy within the visual arts and visual literacy within technology. Initially created to serve as a software sketchbook and to teach computer programming fundamentals within a visual context, Processing evolved into a development tool for professionals...there are tens of thousands of students, artists, designers, researchers, and hobbyists who use Processing for learning, prototyping, and production."
In addition to the presentation and exercises with Processing that Jeremy Blum has for you in the video, if you want a better understanding of the language, you can spend some time going through some of the tutorials on the Processing website. If those tutorials arent your cup of tea, take a look at these resources for learning the basics of Processing:
  1. The intro page from Arduino.cc for the Processing language
  2. A SparkFun intro called "Connecting Arduino to Processing"
  3. An Instructables session on "How to control LEDs with Processing and Arduino"
Mark your calendar for this Thursday, and plan to be at 1385 8th Street, Arcata, California, from 6 to 8 PM for the Humboldt Microcontrollers Group meeting!

**********
Read More..

Arduino Basics From Digi Key and DesignNews

If youre just getting started with microcontrollers and Arduino, you might want to consider a series of online classes coming up next week, June 9 - 13, 2014.

A blog post on DesignNews, titled "Quick-Learn on Arduino Basics," talks about the popular open source single-board microcontroller from Italy that has helped the maker movement expand as rapidly as it has. According to this post,
"...Next week, Design News and Digi-Key will begin a five-day overview of the Arduino in the continuing education program, Get Your Project Started with Arduino. The class will explain what Arduino is and offer website sources. The program will explain what can you do with an Arduino, offer example projects, and explore the Arduino architecture. The class will be presented by Don Wilcher, a passionate electronics technology teacher and an electrical engineer with 26 years of industrial experience. Wilcher worked on industrial robotics systems, automotive electronic modules and systems, and embedded wireless controls for small consumer
appliances..."
The description of the five days of classes can be found here. The online classes start at 2 PM, USA Eastern Time. If you cant watch at that time, I think youll be able to view the archived class later.

Other online class topics, such as the Internet of Things, offered by DesignNews are also listed on the page linked in the previous paragraph.

**********
Read More..

Working On Blum Arduino Basics Video Tutorial 2

So tonight I had a chance to work on the exercises in the Jeremy Blum Arduino Basics video tutorial #2 again.

I had started on the #2 video about a week back, but last week needed to return the borrowed Arduino components to the friend from whom I had borrowed them. The official Arduino Starter Kit I had ordered from Amazon showed up on Thursday. So I now had the parts I needed to resume learning about the basics of microcontrollers.

Finally, tonight I had the time to open up the kit and pick up sort of where I left off with the first exercise in Blum video #2. Before I started the video back up, though, I tried to put together the the laser-cut wooden base for the Arduino and breadboard. Annoyingly, the Italian Arduino folks seem to have either neglected to include the screws for attaching the Arduino to the wooden base, or they forgot to specify the size for those screws when they wrote the book that comes with the kit. The book says to fasten the Arduino to the base with three screws, but thats all it says. I guess thats part of the DIY aspect of the kit. If you want to screw the Arduino to the wooden base, figure out the screw size yourself and get them yourself...

After reviewing a bit of the #2 video, I hooked up the Arduino Uno Rev 3 to a breadboard, a 10K ohm resistor, a switch and an LED (light emitting diode). I watched what Jeremy did in the video, I connected the components with the jumper wires, then I rechecked to make sure everything was the same as in the video. One issue I didnt think about the first time I hooked up this circuit was whether it matters which way the current runs through a resistor or, said another way, whether it matters which lead on a resistor is connected to ground. I tried looking that up in the
SparkFun tutorial on resistors, but couldnt find the answer. I decided to just make sure it was hooked up the same way shown in the video, and Ill search later on Google to find the answer about whether resistors are ok with current going either way through them.

With all the components hooked up, I connected the USB cable into my laptop, then into the Arduino. The LED was supposed to only light up when I pushed the switch, but as soon as I hooked up the USB cable, the LED started flashing on and off. Drat! Didnt do that before when I hooked it up. Unplugged the USB cable, then hooked it back up again. LED still flashed on and off.

Then I realized it was a brand new Arduino Uno, fresh from the manufacturer, and it didnt have the Arduino sketch, or program, uploaded to it yet which would make the LED only come on when I held down the button. Once I uploaded the program, which I had written a week ago when I had the borrowed Arduino, the LED worked properly, lighting up when I held the switch down and going off when I let up on the switch. Success!

Getting late, so time to stop for tonight. Tomorrow Ill try to finish Blum video #2.

**********
Read More..

New Arduino Add Ons USB Host Shield and In System Programmer

Official Arduino USB host shield
If youre a fan of the official Italian Arduino components, their blog just announced two new items -- a USB host shield and an In-System Programmer (ISP).

The Arduino Uno comes with a USB B port, and you use a USB A-to-B cable to connect the Uno to your computer for uploading sketches to the Uno. However, to make your Arduino a USB host, you need to add a shield. There are other USB host shields for the Arduino, such as the SparkFun one for $24.95 or the Circuits@Home one for $25 (a mini one is also available for $20). The official Arduino USB host shield is available from arduino.cc for 24 euros, which is about $33 right now. I couldnt
SparkFun USB host shield
find the official shield at any of the distributors I looked at tonight, probably because its just been released.

So why might you want to get a USB host shield? Well, the Arduino announcement has a long list of uses:

  1. HID devices: keyboards, mice, joysticks, etc.
  2. Game controllers: Sony PS3, Nintendo Wii, Xbox360.
  3. USB to serial converters: FTDI, PL-2303, ACM, as well as certain cell phones and GPS receivers.
  4. ADK-capable Android phones and tables.
  5. Digital cameras: Canon EOS, Powershot, Nikon DSLRs and P&S, as well as generic PTP.
  6. Mass storage devices: USB sticks, memory card readers, external hard drives, etc.
  7. Bluetooth dongles.
If any of those particular use cases are of interest to you, but you still arent totally clear on what is meant by a USB host, or why and how you want to use a USB host shield, Hardware Fun has a good post going into depth about USB host shields for Arduino. Their post explains USB host like this:
"...let’s first understand what is an USB Host Shield. It is a shield which provides USB Host support for Arduino...The USB protocol defines two types of devices. One is called the host (or server) and the other one is called peripheral (client). The Host device controls the peripheral device and also provides power to it. When you connect any USB device like a mouse or a keyboard to your computer, your computer acts as the host and controls (or polls) the client device (keyboard or mouse or even an Arduino). For a successful communication to happen using USB protocol, you need at least one of the device to be the host, which means that you cannot connect two keyboards together and expect them to communicate with each other...Once you have this shield, your Arduino board can act as USB Host and you can connect other USB devices like keyboard, mouse or even an Android phone..."
For lots of technical details and to gain a better understanding of the USB host shield hardware, click on over to the Circuits@Home hardware manual for their USB host shield. The Arduino blog announcement for the official shield says "it can be used with theUSB Host Library for Arduino” hosted by Oleg Mazurov and Alexei Glushchenko from circuits@home" so a lot of the info in the hardware manual will likely also be applicable to, or helpful in understanding, the official Arduino shield. Theres also a reference page for the shield on the arduino.cc site.

The other official Arduino hardware release was an Arduino AVR In-System Programmer. I might do a future post with more about the ISP and programming AVR microcontrollers, but heres what the Arduino blog says about this new hardware:
"It’s a tiny AVR-ISP...useful to anyone needing more space on the Arduino board. Uploading a sketch with an external programmer can be used for three main reasons:
  • remove the bootloader and use the extra space for your sketch 

  • burn the bootloader on your Arduino, so you can recover it if you accidentally corrupt the bootloader. 

  • when you use a new ATmega microcontroller in your Arduino, and you need the bootloader in order to upload a sketch in the usual way."
If either of these items sound useful for your microcontroller projects, you might want to read a bit more about them or place an order!

**********

Read More..

WifiDuino Spark Core Innovation Catalyzed By Arduino

Tonights web exploring in the world of microcontrollers started with seeing an article about WifiDuino.

The concept behind the WifiDuino, I think, is to provide a low-cost, very small, Arduino-compatible single-board microcontroller with wifi capability (and an optional 128 x 64 OLED display). At this point the WifiDuino is a recently-launched Indiegogo campaign, not an immediately available electronic component. The early bird Indiegogo cost to support this campaign is $29 for the WifiDuino unit. If you want the WifiDuino with the small OLED display, the early bird support level for that perk is $44.

For people not familiar with Indiegogo campaigns, when you pledge the $29 or $44, youre not buying a WifiDuino. What youre doing is giving the person or project team who launched the campaign a specified amount of money with the expectation that if the project is successful, your monetary contribution will get you whatever the specified perk was for that level of contribution. With Indiegogo, Kickstarter or many of the other similar crowdfunding or crowd-supported project websites, you always run the risk that youll contribute the amount of money youve chosen and end up with nothing, or with an item that doesnt work or is not quite what you expected.

I dont know enough about microcontrollers yet to know after reading the article whether the WifiDuino would be a useful and cost-effective item for microcontroller projects that need wifi capability. At the next meeting of the Humboldt Microcontrollers Group, on June 12, I plan to ask whether the other people at the meeting think the WifiDuino looks like a good deal, or if they know of better options to achieve the same capabilities.

After looking at the Indiegogo website, I did a bit more online research related to the WifiDuino. On the Indiegogo page for this project, it mentions the Spark, another small Arduino-compatible device with wifi capability. The Spark Core was another crowd-supported project. It was on Kickstarter a year ago, and it was wildly successful. They asked for $10,000 for the Kickstarter campaign, and they raised $567,968! The WifiDuino project still has more than a month to run (so support it if you like the looks of the project), but so far theyve raised only $5855 of the requested $23,000. Its impossible to say if their Indiegogo campaign will catch fire and be successful, but I hope it will. Projects like this are helping drive innovation in the Arduino world in much the same way that Arduino helped catalyze innovation in the microcontroller world.

Two other options for Arduino and wifi are to use, (1) a standard wifi Arduino shield, like the Adafruit CC3000, along with an Arduino Uno, or (2) to use something like the Lantronix xPico WiFi Shield for Arduino that I saw in a recent EE Times article.

The brief online search and reading I did tonight showed me that wifi and Arduinos is yet another microcontroller topic about which Ive a lot to learn. One step at a time...

**********
Read More..

Arduino and Motors Part Not 2 Far

Started breadboarding the first exercise in the #5 Jeremy Blum Arduino Basics video tutorial; it talks about motors and transistors.

Didnt get too far. Got all my electronic components out and sorted through them to find the parts needed for the first Arduino/motor exercise. Got the 1k ohm resistor and the 1 microfarad capacitor. Found a 1N4004 diode, the Arduino Uno, the breadboard and jumper wires. But then I
ran into transistor problems.

The parts list that accompanies Jeremys #5 video says to use a 2N7052 NPN transistor. Well, the
Element14 page for that component says theyre no longer manufactured. Ive got a BC547B NPN transistor and a 2N2222A NPN transistor, but I dont know enough about transistors to know if one of the two transistors I have should work fine instead of the 2N7052. The specs arent quite the same, and I havent yet figured out how to figure that out. Will work on that more tomorrow.

To try and learn a bit more about motors and microcontrollers before the Humboldt Microcontrollers Group meeting this Thursday, I looked at a few more related pages online tonight. One of the topics Im interested in is motor shields for Arduino. Id like to understand when a shield is used, and when the motor is just hooked up to the Arduino without using a shield. Adafruit has a pretty interesting looking shield, the Adafruit Motor/Stepper/Servo Shield for Arduino v2 Kit. It appears to be a pretty versatile component that could be used for a variety of projects.

Well, thats all for tonight. Ran out of time to figure out anything else. Need to learn more about transistors...

**********
Read More..

Arduino Zero Launches!

Arduino has just launched a new microcontroller development board, the Arduino Zero. Two special features of the new product are an Atmel SAMD21 microcontroller (MCU) and embedded debugging.

Having an MCU with the 32-bit ARM Cortex M0+ core makes the unit much more powerful than an Arduino having the 8-bit ATmega328 MCU. The more powerful Arduino Zero should be good for complex robotics projects and will likely be a great introduction to 32-bit programming. (The MCU on the Zero also happens to be a very close relative of the microprocessor used in the Canary Instruments energy monitor...)

At the first Humboldt microcontrollers group meeting on May 15th, it was explained to me that one of the drawbacks of the Arduino platform is that it can be challenging to debug programming problems. The Arduino Zero has an embedded debugging system called EDBG. If interested in the details, check out Atmels PDF for EDBG. The more advanced people in the Humboldt microcontrollers group may want to consider getting a Zero to see whether the EDBG system addresses most of the issues related to debugging Arduino programs.

**********
Read More..


Blog Archive

Diberdayakan oleh Blogger.